Fundamentals and Practices of Sensing Technologies
by Dr.
Keiji Taniguchi, Hon. Professor of
Xi’ an
Dr. Masahiro Ueda, Honorary
Professor, Faculty of Education and Regional Studies
Dr. Ningfeng Zeng, an
Engineer of Sysmex Corporation
(A Global Medical
Instrument Corporation),
Dr. Kazuhiko Ishikawa,
Assistant Professor
Faculty of Education and
Regional Studies,
[Editor’s
Note: This paper is presented as Part XIII of a series from the new book
“Fundamentals and Practices of Sensing Technologies”; subsequent sections will
be featured in upcoming issues of this Journal.]
Chapter Six – Part I
Abstract
for Chapter 6:
Many
high technologies using opto-electronics have, recently, been developed,
realized and used in the practical plants to manufacture a high quality
product.
On
the other hand, technologies using a simple physical principle, we call this
"low technology", have, also, been used successfully. The
representative examples using high technologies are the remote sensing
technology and control technology in an atomic power plant and robot controlled
machine in a semi-conductor industry. Some technologies described in Chaps. 4
and 5 and in this chapter are almost the examples using low technologies. These
low technologies have the following merits.
(1) Almost all the measuring apparatuses
are simple and economical.
(2) The apparatuses have, generally, a
high durability and a high substantiality.
(3) The apparatuses can, easily, be used
to many applications.
(4) The operation for the apparatus can,
previously, be prepared.
In
this chapter, the principles and features of some technologies using
electro-magnetic fields are described. That is, a vacuum leakage sensor for
pressure sensor in 6.1, a water amount sensor in glass fibers in 6.2, a pinhole
sensor for glass wool paper in 6.3, a charge -to-mass ratio sensor for toner
particles in 6.4, and an active sensor for bearing wear in 6.5.
6.1 Vacuum
Leakage Sensor for Pressure Sensor
6.1.1
Introduction
Vacuum
leakage of a pressure sensor used in the car often yields a serious problem
even if the leakage is very small. The most sensitive and precise method now in
practical use is a radio-isotope method. The method has, however, such problems
as high cost and, in particular, environmental pollution. A new technique is
then necessary to alleviate these problems.
In
a previous paper1), we proposed a new method for detecting vacuum
leakage using a pulse discharge technique. The principle is based on the
discharge characteristics called Paschen's law2), whereby the
breakdown voltage of the discharge depends on the pressure. The results
suggested that the method can be used in industry. It poses, however, some
problems for practical use. Two of the serious problems are the lack of
sensitivity and restriction to an applicable range of pressure of the sensor.
These make the method difficult to use practically in industry.
In
this section, we report a new technique to solve these two main problems in
order to make the method applicable in the industrial field.
6.1.2
Improvement on the Previous Method
A.
Previous Method
The
principle and the experimental method are basically same as that reported in
the previous paper1). Figure 6.1(a) shows the experimental set-up
used in the pressure-controlled simulation experiment and figure 6.1(b) shows
the electrical circuit used to obtain the discharge characteristics of a
single-shot discharge. The eight electrode pins embedded in the pressure sensor
were used as an anode. They were connected to each other in order to maintain
the same electrical potential. The shielding body case was used as a cathode. A
high resistance (a few tens of mega-ohms) was used to restrict the discharge
current and to avoid damaging the IC circuit in the sensor due to a
high-voltage discharge and an electromagnetic relay, EMR, was used to obtain an
one-shot discharge with a duration of about a few microseconds ( see Fig.
6.1(b)).
A
simulation experiment was performed in order to obtain the discharge
characteristics, that is, a relation between the discharge potential and the
pressure, just like in the previous paper1). The experiment was
performed using a pseudo-sensor, in which the shielding cap of the sensor can
be removed. The removed cap re-connected to the base of sensor's body so that
the electric field is the same as that of the practical sensor but the pressure
in the pseudo-sensor can be easily controlled.
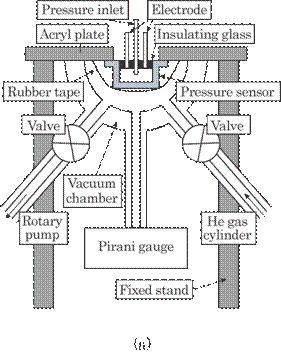
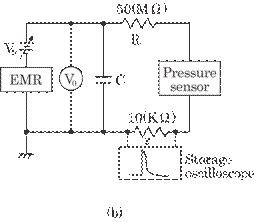
Fig. 6.1
The experimental arrangement. (a) The experimental set-up used to obtain the
pressure-controlled simulation experiment and (b) electrical
circuit for the
single-shot discharge.
The
discharge characteristics can be used for the estimation of pressure in the
sensor, that is, to provide a measurement standard of the inner pressure. The
method, therefore, requires two measurements after a proper time interval T in
order to obtain the vacuum leakage rate.
B.
Improvement
The
accuracy of the estimation of pressure depends on the reproducibility of the
discharge. The potential difference differs by about a few tens of volts around
a mean value in each measurement even if the pressure could be maintained constant1).
The difference, namely, fluctuation, of the discharge potential means that one
requires a long time interval T, for example a week, in order to detect a
maximum allowable vacuum leakage rate, in this case 1![]() 10-5 Pa・cm3s-1.
This was the main disadvantage and prevented the method from being practically
used in the car industry.
10-5 Pa・cm3s-1.
This was the main disadvantage and prevented the method from being practically
used in the car industry.
In
this study, we have made three improvements to reduce the fluctuation of the
discharge potential. Firstly, electric conductive paste was used to keep a good
electric connection between the eight electrical pins leading out and the
high-voltage power line. Secondly, prior to an inspection discharge, a
pre-discharge was carried out to flush the surface of the pressure sensor.
Thirdly, the optimum speed of raising the potential from zero to the discharge
potential was sought and found to be 30 Vs-1.
Another
main disadvantage of the previous method was that the method can only be
applied effectively within a narrow range of inner pressure, 70-150
6.1.3
Results and Discussions
A
simulation experiment was performed to obtain discharge characteristics using
three pseudo-sensors, A, B and C. Figure 6.2 shows an example of the discharge
characteristics for sample A in the pressure range 70-150
It
is generally believed that the discharge potential fluctuates greatly and it is
essentially difficult to use this method for estimation of pressure within high
precision. It is, however, supposed that, under limited conditions, the
fluctuation of the discharge potential can be decreased to a considerable
extent. In this experimental case, the discharge is supposed to occur on the
surface of glass which is used as an insulator between the electrode pins and
the base metal of the pressure sensor. This was proved by the fact that the
discharge potential is almost the same even when the shielding cap was removed
in the simulation experiment. The method has thus been proved to be suitable
for use in industry.
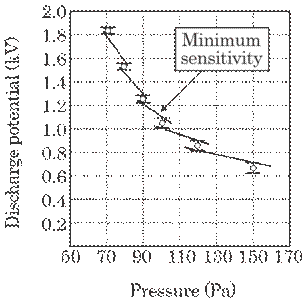
Fig. 6.2
Discharge characteristics for a pseudo-sensor sample. Ten measurements were
performed for each pressure.
Figure
6.3 shows the discharge characteristics for three pseudo-sensor samples in the
pressure range 70-500
It
is useful to define a sensitivity S as follows for evaluation of the method in
practical use.
|
|
(6.1) |
Where ![]() V is a small change of discharge potential due to a small
change in pressure,
V is a small change of discharge potential due to a small
change in pressure, ![]() p. The sensitivity depends strongly on the pressure, as can
be seen in Figs. 6.2 and 6.3. A large S means a high sensitivity in estimating
the pressure from the discharge potential. It is natural to use a mean
sensitivity, mean S, which is obtained from the averaged discharge potential at
each pressure. In the previous paper, we used the mean sensitivity. It may,
however, be more useful to use the minimum sensitivity to find out for certain
the maximum allowable leakage rate of the sensor, Rm. That is, this
never misses leakage rates lager than Rm and is essential for
industrial use from the viewpoint of safety planning. The minimum sensitivity,
Smin, can be obtained from the straight line shown in Fig. 6.2. The
standard Rm now used in the car industry is 1
p. The sensitivity depends strongly on the pressure, as can
be seen in Figs. 6.2 and 6.3. A large S means a high sensitivity in estimating
the pressure from the discharge potential. It is natural to use a mean
sensitivity, mean S, which is obtained from the averaged discharge potential at
each pressure. In the previous paper, we used the mean sensitivity. It may,
however, be more useful to use the minimum sensitivity to find out for certain
the maximum allowable leakage rate of the sensor, Rm. That is, this
never misses leakage rates lager than Rm and is essential for
industrial use from the viewpoint of safety planning. The minimum sensitivity,
Smin, can be obtained from the straight line shown in Fig. 6.2. The
standard Rm now used in the car industry is 1![]() 10-5 Pacm3s-1, which is
obtained from consideration of a car life time of about 15 years.
10-5 Pacm3s-1, which is
obtained from consideration of a car life time of about 15 years.
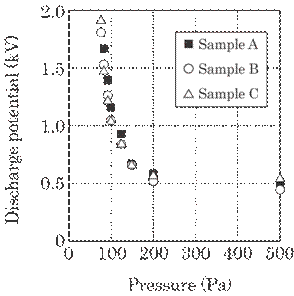
Fig. 6.3
Discharge characteristics for three typical sensor samples. The value at each
pressure is the mean values of ten measurements.
Table
6.1 shows the minimum sensitivity for three pseudo-sensor samples, A, B and C,
one of which is obtained from Fig. 6.2. The blank column for sample A means
that the discharge did not take place even at 2000 V, which is the maximum
supply voltage in this experiment. The error in pressure due to the fluctuation
of the discharge potential can be determined by the values in table 6.1.
Table 6.1
Minimum sensitivities S defined by Smin=|![]() Vmin/
Vmin/![]() P|, where
P|, where ![]() Vmin is the minimum difference between the
discharge potentials in each pressure range and
Vmin is the minimum difference between the
discharge potentials in each pressure range and ![]() P is the difference in pressure.
P is the difference in pressure.
|
Sample |
Pressure (Pa) |
||||
|
70-80 |
80-90 |
90-100 |
100-120 |
120-150 |
|
|
A |
|
25.0 |
21.5 |
10.8 |
6.9 |
|
B |
27.1 |
23.9 |
14.2 |
6.0 |
4.5 |
|
C |
40.8 |
21.5 |
10.4 |
6.1 |
4.5 |
Table
6.2 shows the discharge potential of the practical pressure sensors. Two kinds
of sensor were used: one has high discharge potential, 1100-1500 V, which means
that the inner pressure of the sample is estimated to be relatively low, 80-100
Torr, as can be seen in Fig. 6.3, whereas the other has a low potential,
500-600 V, namely a high inner pressure of around 150-200 Torr.
Table
6.2 Some examples of discharge
potentials observed in 16 practical sensors. The fluctuation of the discharge
potential is shown as the peak-peak (P-P) value. Two kinds of sensors were
used; one has a high discharge potential and the other has a low discharge
potential.
|
Sensor number |
Discharge potential (V) |
|||||||||||
|
1st |
2nd |
3rd |
4th |
5th |
6th |
7th |
8th |
9th |
10th |
Vave |
Vp-p |
|
|
1 |
1492 |
1484 |
1476 |
1468 |
1468 |
1468 |
1484 |
1492 |
1492 |
1468 |
1479 |
24 |
|
2 |
974 |
990 |
974 |
974 |
974 |
991 |
982 |
982 |
990 |
990 |
982 |
17 |
|
3 |
1229 |
1229 |
1214 |
1229 |
1222 |
1229 |
1237 |
1237 |
1229 |
1237 |
1229 |
23 |
|
4 |
1213 |
1214 |
1213 |
1198 |
1198 |
1214 |
1222 |
1214 |
1214 |
1214 |
1211 |
24 |
|
5 |
1477 |
1488 |
1488 |
1489 |
1489 |
1477 |
1500 |
1489 |
1489 |
1500 |
1489 |
23 |
|
6 |
1275 |
1299 |
1299 |
1299 |
1299 |
1275 |
1287 |
1299 |
1299 |
1299 |
1293 |
24 |
|
7 |
1072 |
1049 |
1072 |
1072 |
1049 |
1049 |
1072 |
1061 |
1061 |
1072 |
1063 |
23 |
|
8 |
1097 |
1084 |
1109 |
1097 |
1109 |
1109 |
1109 |
1109 |
1109 |
1109 |
1104 |
25 |
|
9 |
544 |
528 |
544 |
502 |
544 |
528 |
502 |
502 |
502 |
512 |
521 |
42 |
|
10 |
568 |
545 |
576 |
545 |
553 |
584 |
568 |
584 |
568 |
545 |
564 |
39 |
|
11 |
470 |
470 |
430 |
454 |
462 |
430 |
430 |
430 |
430 |
446 |
445 |
40 |
|
12 |
576 |
576 |
544 |
576 |
536 |
536 |
536 |
568 |
576 |
560 |
558 |
40 |
|
13 |
536 |
544 |
544 |
536 |
536 |
528 |
536 |
536 |
544 |
544 |
538 |
16 |
|
14 |
624 |
616 |
624 |
656 |
656 |
624 |
616 |
616 |
624 |
616 |
627 |
40 |
|
15 |
608 |
640 |
632 |
608 |
608 |
608 |
640 |
624 |
608 |
624 |
620 |
32 |
|
16 |
656 |
656 |
632 |
656 |
616 |
648 |
632 |
616 |
616 |
624 |
635 |
40 |
Ten
measurements were performed for each sensor. The maximum fluctuations of the
discharge potential, Vp-p, were all smaller than 25 V for this kind
of low-pressure type. The fluctuation was, however, about 40 V for the
high-pressure type. A rather small fluctuation can thus be obtained by
implementing the improvements mentioned in 6.1.2.B. The fluctuation causes a
presumed error in pressure. The reduction of this fluctuation is one of the
most important factors for this method to be effectively used in the industrial
field. That is, the error can be used as a standard for a clear distinction of
vacuum leakage from error in pressure. The presumed error in pressure depends
also on the sensitivity mentioned above. For an example, the error in pressure
can be calculated to be 2.4 Pa(=25/10.4) for the
fluctuation potential of 25 V and the
minimum sensitivity of 10.4 VPa-1. The presumed error in pressure,
finally, determines the accuracy of this method, in other words, determines the
shortest time required in order to detect the allowable maximum leakage rate.
The required time can, thus, be determined from the presumed error in pressure
due to the potential fluctuation, the minimum sensitivity, the allowable
maximum leakage rate and the sensor's volume.
The
increase in pressure can be calculated to be 1.7 Pa per day if the sensor leaks
with the maximum leakage rate of Rm = 1![]() 10-5 Pacm3s-1 and the
sensor's volume is 0.5 cm3. For example, the time required can,
then, be calculated to be 1.39(=2.4/1.7) days for the presumed error in
pressure of 2.4
10-5 Pacm3s-1 and the
sensor's volume is 0.5 cm3. For example, the time required can,
then, be calculated to be 1.39(=2.4/1.7) days for the presumed error in
pressure of 2.4
Table
6.3 shows the presumed error in pressure and table 6.4 shows the required time
in days for these samples, A, B and C, and various pressure ranges. These are
used for the measurement standard of this method.
The
values, however, differ slightly from each other. We, may, therefore, use a
smaller sensitivity and then a longer detecting time in order to take a safe
measurement. From the practical point of view, the time interval T between the
two measurements to obtain the vacuum leakage rate should be less 3 days.
Therefore, it is concluded from tables 6.3 and 6.4 that the method can only be
useful for the pressure range 70-150 Pa; an example of this is sensors 1-8 in
table 6.2.
Table
6.3 The sensitivity of this method in
terms of the estimated maximum error in pressure caused by a fluctuation in
potential of 25 V.
|
Sample |
Pressure (Pa) |
||||
|
70-80 |
80-90 |
90-100 |
100-120 |
120-150 |
|
|
A |
|
1.00 |
1.16 |
2.32 |
3.62 |
|
B |
0.92 |
1.05 |
1.76 |
4.17 |
5.56 |
|
C |
0.61 |
1.16 |
2.40 |
4.10 |
5.56 |
Table
6.4 The sensitivity of this method in
terms of the minimum number of days required in order to detect the maximum
allowable leakage rate of 1![]() 10-5 Pacm3s-1 for a
practical sensor.
10-5 Pacm3s-1 for a
practical sensor.
|
Sample |
Pressure (Pa) |
||||
|
70-80 |
80-90 |
90-100 |
100-120 |
120-150 |
|
|
A |
|
0.58 |
0.68 |
1.34 |
2.10 |
|
B |
0.53 |
0.61 |
1.02 |
2.41 |
3.22 |
|
C |
0.35 |
0.67 |
1.39 |
2.37 |
3.22 |
The
sensitivity decreases abruptly when the inner pressure is over 150
Table
6.5 shows the relation between the discharge potential and the total inner
pressure for a sensor filled with air and He gas. As shown in Fig. 6.3, the
discharge potential surely decreases as the inner pressure increases in the
pressure range 70-500
Table 6.5 The effect of
He gas on the discharge characteristics.
|
Discharge |
Air(Pa) |
|
Air+He gas(Pa) |
||
|
150 |
190 |
|
150+68 |
190+28 |
|
|
First |
649 |
644 |
|
1196 |
785 |
|
Second |
623 |
574 |
|
1172 |
825 |
For this purpose, sensors with a high
pressure, above 150 Pa, namely a low discharge potential must be set in a
chamber filled with only He gas for a few days. A detailed experiment and a
theoretical analysis will be required for the determination of the leakage
rate.
Only
a theoretical analysis for the leakage rate of each gas was performed for the
estimation of the amount of each gas that leaked into the sensor. Figure 6.4
(a) shows a conceptual expression for the pinhole and Fig. 6.4(b) is for gas
leakage. Two chambers are isolated by a wall with a small pinhole; one is
maintained at vacuum and the other at atmospheric pressure.
The
basis of the theory is to calculate the dimension of the pinhole for a given
leakage rate and the amount of gas being leaked through the pinhole. The amount
of gas leaked, ![]() N, can be expressed, from a consideration of
thermo-statistical mechanics3), as
N, can be expressed, from a consideration of
thermo-statistical mechanics3), as
|
|
(6.2) |
where n is the number density of gas
molecules, S is the cross-sectional area of the pinhole and V is the thermal
velocity.
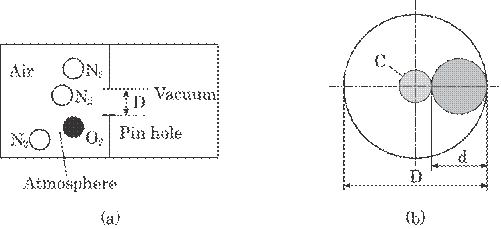
Fig. 6.4 A
schematic diagram of the gas leak. (a) a model of the pinhole and (b) the
concept of gas leakage.
S can be calculated to be
|
|
(6.3) |
assuming a maximum allowable leakage rate
of Rm = 1![]() 10-5 Pacm3s-1. If the area
is assumed to be a disc, the diameter D can be calculated to be
10-5 Pacm3s-1. If the area
is assumed to be a disc, the diameter D can be calculated to be
|
|
(6.3)' |
Molecular diameters d of He, N2
and Kr are given as follows4),
|
|
(6.4) |
N2 gas is considered as air in
this case. The effective cross sectional area C by which each molecule goes
past the pinhole without colliding with a wall, therefore, can be obtained as,
|
|
|
|
|
(6.5) |
The leakage rate R is directly
proportional to this effective cross sectional area and the mean thermal
velocity V which can be calculated to be VHe = 1.367 kms-1,
VN2 = 0.516 kms-1, VKr = 0.299 kms-1
assuming a room temperature T = 300 K. We can, then, obtain the relation of the
leakage rates of each gas, as follows:
|
|
(6.6) |
The result shown above was obtained by
assuming that the pinhole is just a disc in shape. The actual shape of the
pinhole may be an ellipse and the ratio may become larger than that of Eq.
(6.6). Therefore, it is assumed that the inner pressure due to leakage of gas
into the sensor increases faster for He than it does for air by a factor of
about a few tens. As a result, the increase in pressure during a day is
expected to be about 30-50 Pa(=1.7![]() 1
1![]() RHe/RN2) for the maximum allowable
leakage rate of Rm = 1
RHe/RN2) for the maximum allowable
leakage rate of Rm = 1![]() 10-5 Pacm3s-1. This amount
of gas pressure increment would sufficiently increase the discharge potential,
as can be seen from table 6.5. This makes the method effective even in the
pressure range above 150
10-5 Pacm3s-1. This amount
of gas pressure increment would sufficiently increase the discharge potential,
as can be seen from table 6.5. This makes the method effective even in the
pressure range above 150
The
most sensitive method now used for the detection of air leakage is a
radio-isotope method. It requires about 2 days to detect the maximum allowable
leakage rate of Rm = 1![]() 10-5 Pacm3s-1 clearly. The
method may, however, have a problem from the consideration mentioned above,
namely that air leaks although Kr does not leak when the cross section of the
pinhole is not a disk but rather a hole with the shape of a long and narrow
ellipse.
10-5 Pacm3s-1 clearly. The
method may, however, have a problem from the consideration mentioned above,
namely that air leaks although Kr does not leak when the cross section of the
pinhole is not a disk but rather a hole with the shape of a long and narrow
ellipse.
In
conclusions, the following results were obtained.
(1) The new method using the discharge
technique has been developed to detect the vacuum leakage of the pressure
sensor.
(2) The applicable pressure range is
extended from 70-150 Pa to a few hundred Pa by employing He gas as the
surrounding gas to detect the leakage.
(3) The efficiency of this method is
equal to or higher than the radio-isotope method now in practical use.
6.2 Water
Amount Sensor in Glass Fibers
6.2.1
Introduction
Recently,
various techniques based on opto-electronic engineering have been developed and
applied to many production processes in factories for checking the product
quality. However, an idea based on a simple and classical physical principle is
sometimes still very useful even under conditions where modern techniques are
not so effective or are quite powerless. Also, another advantage of a simple
and classical method is its low cost. In a previous study5), we
proved that a pulse discharge technique, though it is a very old technique in
science, is very useful to detect the leakage of pressure sensors.
In
this study, the property of static electricity was shown to be successfully
applied to detecting the water amount on the surface of glass fibers. Recently
there have been many demands for glass fibers in industrial fields not only for
use in optical fibers but also for materials with various functions. One of
them is the application to a separator for a lead-sulfuric-acid battery. This
kind of fiber has a homogeneous structure. The glass fiber was produced from
melted glass by being pushed out of a nozzle. The molten glass was immediately
cooled by exposure to a shower of cold water to form a thin fiber (20 ![]() m in diameter), and it was rolled on a spindle. The fiber was
cut to about 3 m in length and formed into a bundle. The bundle of glass fibers
was then dried to reduce the water on the surface to a suitable level. The
presence of adequate water on the surface of the glass fiber is very important
when fabrication of the separator is done. The best condition for the water
content is known to be in the range between 0.1 and 0.3 weight percent. The
weight of water attached on the surface of the glass fiber can be calculated by
subtracting the net weight of the glass fiber which is obtained after being
completely dried. However, the method takes time, thus it was not often used on
a practical basis. Usually in the production stage in factories, skilled
persons check the water amount based on their intuition when they touch the
fibers with their fingers. Therefore, development of a new method for detecting
the water on the surface of glass fibers has been required in the industrial
field. In the case of water in the atmosphere, we can employ an infrared
absorption method. However, this method cannot be applied in this case because
the glass itself has a high absorbance in the infrared spectral region. Also,
the Raman spectroscopic technique is impractical in factories because of its
high cost.
m in diameter), and it was rolled on a spindle. The fiber was
cut to about 3 m in length and formed into a bundle. The bundle of glass fibers
was then dried to reduce the water on the surface to a suitable level. The
presence of adequate water on the surface of the glass fiber is very important
when fabrication of the separator is done. The best condition for the water
content is known to be in the range between 0.1 and 0.3 weight percent. The
weight of water attached on the surface of the glass fiber can be calculated by
subtracting the net weight of the glass fiber which is obtained after being
completely dried. However, the method takes time, thus it was not often used on
a practical basis. Usually in the production stage in factories, skilled
persons check the water amount based on their intuition when they touch the
fibers with their fingers. Therefore, development of a new method for detecting
the water on the surface of glass fibers has been required in the industrial
field. In the case of water in the atmosphere, we can employ an infrared
absorption method. However, this method cannot be applied in this case because
the glass itself has a high absorbance in the infrared spectral region. Also,
the Raman spectroscopic technique is impractical in factories because of its
high cost.
In this section, we propose a very simple and practical method for
measuring a water amount in the glass fibers by means of a static leakage current.
6.2.2
Principle and Method
In
a preliminary experiment, a leaf-electrometer was used to examine how the water
on the surface of the fibers influenced the leakage of static electricity
stored in the leaf-electrometer. As a result, it was proved that, depending on
the humidity in the room in which the fiber bundle was placed and also on the
time it was left in the room, leakage current characteristics were quite
different when the fiber bundle was touched by the electrode of the
leaf-electrometer. Namely, when the humidity was high, the leaf of the
leaf-electrometer soon closed. However, when the fibers were completely dried
in a dry box, the leaf of the leaf-electrometer did not close, showing
essentially no electrical conductivity. Such a phenomenon is essentially the
same as that well known as the leakage of the static electricity. It is
believed that ions such as Na+ are easily produced with the aid of
water present on the surface of the materials and contribute to the electrical
conduction6). Prior to this experiment, we tried to use a
conventional meg-ohm meter which is normally used to check for electrical
insulation. However, the meter proved to be useless when the water amount on
the glass fiber to be measured was lower than about 0.5%, showing infinite
resistance.
In
order to measure the transient leakage current, simple and compact equipment
was designed and constructed. Figure 6.5 shows the schematic diagram of the
equipment. The
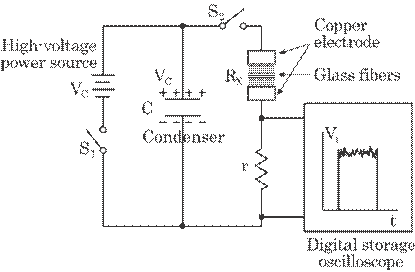
Fig. 6.5
Experimental setup used to measure the leakage current of static electricity
flowing on the surface of glass fibers.
bundle of fibers was sandwiched between
two electrodes. A high-voltage power source used for a flash lamp in a
commercial disposable camera was used in this experiment. First, capacitor C (about
400 ![]() F) was charged up to around 400 V by the high-voltage power
source. The charge of static electricity flows through the surface of the fiber
when switch S2 was turned on immediately after the switch S1
was disconnected. The leakage current can be calculated by the pick-up voltage
detected with the resistance r; the resistance value was changed in the range
from several tens of k
F) was charged up to around 400 V by the high-voltage power
source. The charge of static electricity flows through the surface of the fiber
when switch S2 was turned on immediately after the switch S1
was disconnected. The leakage current can be calculated by the pick-up voltage
detected with the resistance r; the resistance value was changed in the range
from several tens of k![]() to several hundred k
to several hundred k![]() , depending on the water amount. The pick-up voltage was
detected using a digital storage oscilloscope.
, depending on the water amount. The pick-up voltage was
detected using a digital storage oscilloscope.
The
current value varies with the thickness of the bundle of fibers and also with
the pressure applied to the electrodes. The thickness of the bundle was kept
constant at 10 mm in this experiment because this is the thickness during the
production of the fibers. The illustration of the electrodes is shown in Fig.
6.6(a). Two copper-clad boards (size, 100![]() 150 mm) were used for the electrodes. Each of the electrodes was
stacked on a plastic plate (100
150 mm) were used for the electrodes. Each of the electrodes was
stacked on a plastic plate (100![]() 600
600![]() 10 mm). In order to supply almost constant pressure when the
electrodes sandwiched the fiber bundle, a rubber band was used. Figure 6.6(b)
shows an illustration of how the electrodes sandwich the fiber bundle during
the measurement. The gap between the
10 mm). In order to supply almost constant pressure when the
electrodes sandwiched the fiber bundle, a rubber band was used. Figure 6.6(b)
shows an illustration of how the electrodes sandwich the fiber bundle during
the measurement. The gap between the
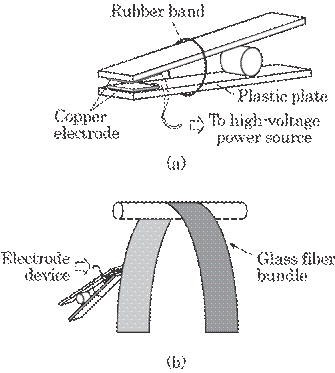
Fig. 6.6
(a) Illustration of the electrodes used for sandwiching the glass fibers and
(b) illustration showing how the electrodes encompass the fiber bundle.
two electrodes was expanded once, and the
fiber bundle was sandwiched while hanging during the drying process. Subsequent
to sandwiching the glass fibers, the electrical current started to follow and
immediately attained a maximum value within a few hundred milliseconds.
Therefore, the measurement was finished within a short time of about 0.5 s.
In
order to obtain an accurate measurement of the water attached on the surface of
the fibers, the weight of the bundle of fibers was measured twice, namely once
just after the leakage current measurement, and again after being completely
dried for 30 min in a desiccator box. The water amount was calculated from the
difference in weight.
6.2.3
Result and Discussions
Figure
6.7 shows a typical oscilloscope trace obtained from the experiment shown in
Fig. 6.5. The trace shows almost no decay. This is because the charge stored in
capacitor C is considerable, and the current flowing in the circuit is as low
as ![]() A in magnitude.
A in magnitude.
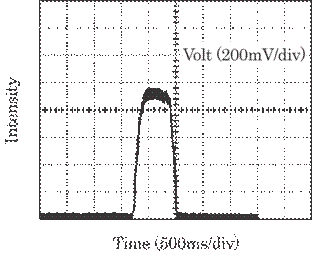
Fig. 6.7
Typical oscilloscope trace obtained from the experiment shown in Fig. 6.5.
Figure
6.8 shows the relationship between the water amount on the fiber surface and
the
leakage current. Many samples containing
various amounts of water from 0.08 to 1.2% were used in this experiment. A
linear relationship was observed.
As
described above, the best condition for the water amount on the surface of the
fiber is in the range between 0.1 and 0.3 weight percent. Therefore, on the
basis of the results shown in Fig. 6.8, we can say that this method can be
practically applied to the measurement of water on the surface of the fibers.
It
was also observed that when the pressure applied to the electrodes increases,
the slope of the straight line in Fig. 6.8 increases. This is probably due to
increased pressure causing better contact among the fibers and as a result, the
actual path length of the fibers between electrodes became short.
In
conclusions, the following results were obtained.
(1) The leakage current shows an almost
linear relation to the water amount in the range between 0.08 and 1.2 weight
percent.
(2) This method can be applied in
factories as a highly sensitive, real-time method of determining a small amount
of water attached on the fiber surface.
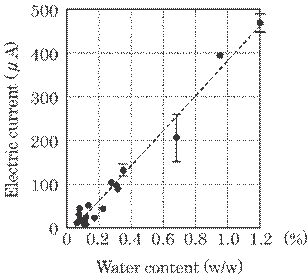
Fig. 6.8
Relationship between the water amount on the surface of glass fibers and the
leakage current.
6.3
Pinhole Sensor for Glass Wool Paper
6.3.1
Introduction
Hitherto
glass has generally been employed in the format windows, glass tubes and
vessels. It has recently proved useful as an adiabatic mat, a soundproof mat,
and a dustproof filter, all owing to the technical development of glass wool
production. These mats have been used widely in cars and buildings, and the
filter has been used in a semiconductor production factory. The functional
efficiency of each product depends largely on the manufacturing process, i.e.,
the product is affected by factors of weight density, g/m2, and the
mean fiber diameter of the raw glass wool. We have developed a practical system
for measuring the weight density in real time7),8), and using an
optical sensor to gauge the mean fiber diameter9).
When
the glass wool is to be used for a dustproof filter, in addition to these
factors, the pinholes have to be detected and removed. Heretofore, CCD camera
has been used for purposes of pinhole detection. This apparatus cannot,
however, detect a pinhole of diameter smaller than approximately 0.5mm, and,
further, is too costly for practical use.
We
propose here a practical method for detecting a pinhole in real time. The
principle of this method is based on the discharge phenomenon, whereby the
breakdown voltage slightly decreases at a pinhole. This method of detection
demonstrates high sensitivity, and the system is very simple and cheap enough
for practical use.
6.3.2
Principle and Experimental Method
The
breakdown voltage for pinhole detection depends on the permittivity of the
material between the two electrodes. That is, the breakdown voltage changes
when a glass wool paper were inserted between the two electrodes.
Figure
6.9 shows the electric circuit for the experiment. A negative high voltage was
applied to the needle-shaped cathode. A metal roller was used as an anode which
was connected to earth electrically from the practical point of view. A high
resistance, R, was connected in series to the circuit to control the current;
it does not affect the breakdown voltage, as discussed in section 6.3.4. In
addition to this high resistance, two low resistances, r and rs,
were also connected in the circuit in series. Both the resistance r and rs
are used to detect electric discharge. The resistance rs gives an
alarm and r puts the discharge on record. The capacitor C is charged by the
power supply. Once a discharge takes place between both electrodes, i.e., anode
and cathode, a discharge current flows, and the voltage between these
electrodes decreases in an instant, and finally the discharge stops. An
electric power source, however, charges the capacitor within 0.3 ms.
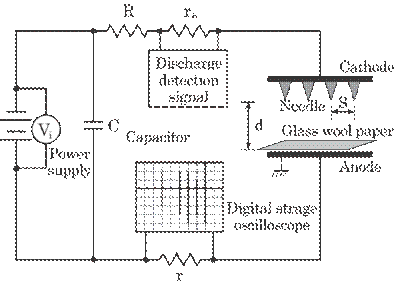
Fig. 6.9
Electric circuit for the discharge method.
Figure
6.10 shows the illustration of pinhole detection. Essentially, the practical
advantage of this method is that the discharge voltage for air, VD,
is lower than that for the glass wool paper, VP. The source voltage
for pinhole detection, Vd, has, therefore, to be chosen between VP
and VD. Thus the breakdown will take place only at the pinhole,
which, in conclusion, suggests the existence of pinhole.
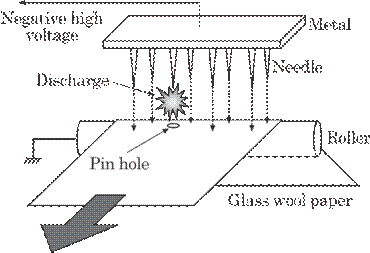
Fig. 6.10
Illustration of pinhole detection by means of electric discharge.
.
The
breakdown voltage is determined by the strength of an electric field, which, in
concrete terms, consists of the following: a permittivity between two
electrodes; a distance between these electrodes, d; equidistant separation
between needles constituting a cathode, s; a pinhole size to be detected, ![]() ; and a moving velocity of the glass wool paper, v. Another
practical factor to be considered in industrial use is the deviation of the
pinhole from a point just below the needle head, p, which may slightly increase
the breakdown voltage. These will be discussed in sections 6.3.3 and 6.3.4.
; and a moving velocity of the glass wool paper, v. Another
practical factor to be considered in industrial use is the deviation of the
pinhole from a point just below the needle head, p, which may slightly increase
the breakdown voltage. These will be discussed in sections 6.3.3 and 6.3.4.
6.3.3
Experimental Results
All
the factors affecting the discharge voltage were examined in an effort to
establish the acceptable conditions for practical application of this method.
First
of all, we examined the effect of glass wool paper on the discharge voltage.
Figure 6.11 shows the relation between discharge voltage, VD, and
the thickness of the paper, t. The distance between cathode and anode, was d=3
mm. The discharge voltage increases approximately linearly with the thickness
of the glass wool paper. From the figure, the dielectric strength for air was
found to be about 1.2 kV/mm (= 3.6/3), while that for the glass wool paper was
about 2.5 kV/mm( = (9.2-5.2)/(2.4-0.8)). This enables us to use the method
practically; i.e., the discharge will only take place at the pinhole under the
condition of proper voltage.
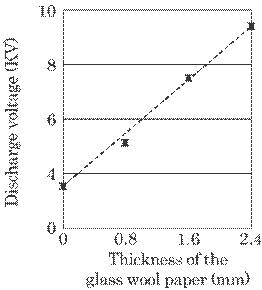
Fig. 6.11
Relation between the discharge voltage and the thickness of glass wool paper
for s = 4mm, d = 3mm, and p = 0 mm.
Secondly,
we examined the discharge characteristics by means of a digital oscilloscope.
Figure 6.12 shows this example. The experimental conditions were d = 4 mm, s =
4 mm, VD = 5.8 kV, R = 100 k![]() ,
, ![]() = 1.2 mm, t = 0.8 mm, p = 0 mm, and v = 50 mm/s. It was found
that
= 1.2 mm, t = 0.8 mm, p = 0 mm, and v = 50 mm/s. It was found
that
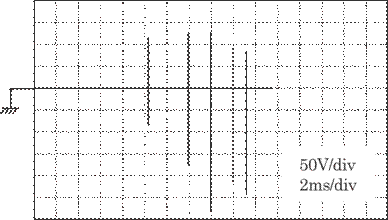
Fig. 6.12
Discharge characteristics. Discharge conditions: separation between needles is
S=4mm; distance between anode and cathode is d=4mm; and discharge voltage is VD=5.8
kV.
the discharge takes place intermittently
at a period of about a few ms and the duration of the discharge was about 10
ms, and further the discharge voltage acquires negative as well as positive
values, while one should expect either one or the other. This suggests that the
rest of the system acts as a capacitance. The discharge voltage of 5.8 kV in
Figure 6.11 is an estimate, calculated as follows: 2.5![]() 0.8 + 1.2
0.8 + 1.2![]() 3.2 = 5.84. Many similar experiments were carried out under
various discharge conditions. The discharge characteristics were comparable
under all experimental conditions. Acceptable conditions for a practical use of
this pinhole detection method will be obtained from the results of these
experiments.
3.2 = 5.84. Many similar experiments were carried out under
various discharge conditions. The discharge characteristics were comparable
under all experimental conditions. Acceptable conditions for a practical use of
this pinhole detection method will be obtained from the results of these
experiments.
Table 6.6 represents the discharge
voltage when the pinhole was placed just below the needle cathode, and Table
6.7 the discharge voltage when the pinhole was shifted 1 mm for s = 2 mm, 2 mm
for s = 4 mm, and 3 mm for s = 6 mm. That is, the pinhole was placed in the
middle, between the needles. In this table, (a) shows the results obtained for
R = 0![]() , and (b) those for 100 k
, and (b) those for 100 k![]() . As is well known, discharge is an uncertain phenomenon in
the sense that it depends on such microscopic conditions as a surface condition
and a surrounding condition as well as such the macroscopic conditions as a
discharge voltage, a distance between electrodes and a resistance for the
discharge. That is, each discharge occurs at slightly a different discharge
voltage even though these macroscopic conditions are maintained. Thus each
datum in these tables represents the mean value of ten measurements. The error
of the
. As is well known, discharge is an uncertain phenomenon in
the sense that it depends on such microscopic conditions as a surface condition
and a surrounding condition as well as such the macroscopic conditions as a
discharge voltage, a distance between electrodes and a resistance for the
discharge. That is, each discharge occurs at slightly a different discharge
voltage even though these macroscopic conditions are maintained. Thus each
datum in these tables represents the mean value of ten measurements. The error
of the
Table 6.6
Discharge voltage for various discharge conditions when the pinhole was just
below the needle, each value is a mean value for ten measurements.
|
|
d(mm) |
|
Discharge voltage(kV) |
||
|
|
S=2(mm) |
S=4(mm) |
S=6(mm) |
||
|
(a) R=0(M |
2.5 |
0.0 |
5.2 |
5.2 |
5.2 |
|
|
0.1 |
4.3 |
4.6 |
4.2 |
|
|
|
0.3 |
4.2 |
4.2 |
4.4 |
|
|
4.0 |
0.0 |
6.9 |
6.1 |
6.4 |
|
|
|
0.1 |
6.3 |
5.2 |
4.8 |
|
|
|
0.3 |
5.4 |
5.4 |
5.3 |
|
|
(b) R=100(M |
2.5 |
0.0 |
5.1 |
5.2 |
5.2 |
|
|
0.1 |
4.5 |
4.5 |
4.3 |
|
|
|
0.3 |
4.4 |
4.6 |
4.6 |
|
|
4.0 |
0.0 |
7.0 |
6.4 |
6.6 |
|
|
|
0.1 |
6.7 |
5.0 |
4.7 |
|
|
|
0.3 |
5.5 |
5.4 |
5.0 |
|
Table 6.7
Discharge voltage for various discharge conditions when the pinhole was
shifted from the needle,
each value is a mean value for ten measurements.
|
|
d(mm) |
|
Discharge voltage(kV) |
||
|
|
S=2(mm) |
S=4(mm) |
S=6(mm) |
||
|
(a) R=0(M |
2.5 |
0.0 |
- |
- |
- |
|
|
0.1 |
5.0 |
5.0 |
|
|
|
|
0.3 |
4.8 |
4.9 |
|
|
|
4.0 |
0.0 |
- |
- |
- |
|
|
|
0.1 |
6.7 |
5.2 |
5.6 |
|
|
|
0.3 |
5.1 |
5.7 |
5.7 |
|
|
(b) R=100(M |
2.5 |
0.0 |
- |
- |
- |
|
|
0.1 |
5.0 |
5.0 |
|
|
|
|
0.3 |
4.9 |
4.7 |
|
|
|
4.0 |
0.0 |
- |
- |
- |
|
|
|
0.1 |
5.9 |
5.3 |
5.5 |
|
|
|
0.3 |
5.2 |
5.7 |
5.7 |
|
discharge voltage was in each case within
200 V from the mean value. The blank column in
the tables indicates that discharge did
not take place even at the relatively high voltage of 8 kV. A mark of ![]() indicates that the
discharge occurred somewhere other than at a pinhole.
indicates that the
discharge occurred somewhere other than at a pinhole.
Tables
6.6 and 6.7 shows the mean discharge voltage, where the rate of detection of
the pinhole, in other words, the rate of an occurrence of the discharge, was
about 70 % for ten measurements. On the whole, these tables suggest the
following.
(1) The high resistance R hardly changes
the discharge voltage; that is, it will only control the discharge current. The
effect of R on the discharge current will be discussed in section 6.3.4.
(2) Both the separation, s, and the
pinhole size, ![]() , in these ranges have little effect on the discharge
voltage, excepting a clear effect of needle separation on excess discharge as denoted
by
, in these ranges have little effect on the discharge
voltage, excepting a clear effect of needle separation on excess discharge as denoted
by ![]() in Table 2.
in Table 2.
(3) Finally the experiment was carried
out to examine the effect of a velocity of glass wool paper on the discharge
voltage. It was found that the increase in velocity from 0 to 3m/min only
increased the mean discharge voltage by about 300 V.
6.3.4
Discussions
The
detection rate will depend on many factors, such as the distance between
electrodes, d; separation between the needles constituting a cathode, s; the
size of the pinhole to be detected, ![]() ; and the moving velocity of the glass wool paper, v.
; and the moving velocity of the glass wool paper, v.
A. Factors
Affecting the Detection Rate
Two
factors are connected with the electrode, i.e., d and s, which may have a
notable effect on the detection rate since it strongly affects the electric
field. They are discussed in (a) and (b) in this section. The other two factors
are connected with the practical conditions, i.e., ![]() and v, which are
discussed in (c) and (d).
and v, which are
discussed in (c) and (d).
(a)
Distance between electrode, d
From
a practical point of view, a large distance, d, is desirable; otherwise, the
needle cathode may come in contact with the glass wool paper when the paper
moves through that region because the paper rises to the surface occasionally
due to a local lack of tension. However, a large distance needs a rather high
discharge voltage, above 10 kV. A point of compromise for the acceptable
distance in practical use was found between 2 and 4 mm, based on our
experiments. Considering the element of strength of the electric field, the
separation between needles, s, were set at s = 2, 4, and 6 mm, the experiments
were conducted for various combinations of d = 3 and 4 mm, and s = 2, 4, and 6
mm, to establish the acceptable conditions for the practical pinhole detection.
Each experiment was carried out for ten measurements.
A
clear difference due to a change of d was not found within the tested range. We
then chose d = 3 mm as a practical distance, i.e., acceptable distance in
practical use.
(b)
Separation between needles, s
It
was found from these experiments that the shift amount of the pinhole from the
needle point, just on the glass wool paper, p, remarkably affects the detection
rate. The detection rate was about 60 % for both electrode s = 2 or 4 mm, even
when the shift amount was s/2, which corresponded to maximum shift amount. On
the contrary, the detection rate with the electrode of s = 6 mm was about 100 %
when the pinhole was just below the needle, i.e., p = 0 mm; it was about 75 %
when p = 1 mm; and, finally, it was 10 % when p![]() 2 mm. This shows an important aspect of design of the
electrodes. That is, one of the most reasonable electrode designs may be the
one shown in Figure 6.13, which has three rows of electrodes, each of which
consists of many needles with a separation of s = 6 mm and the lines shifted 2
mm from each other. With this design, the shift amount, p, can then be p
2 mm. This shows an important aspect of design of the
electrodes. That is, one of the most reasonable electrode designs may be the
one shown in Figure 6.13, which has three rows of electrodes, each of which
consists of many needles with a separation of s = 6 mm and the lines shifted 2
mm from each other. With this design, the shift amount, p, can then be p![]() 1 mm and a detection rate above 70 % can be obtained.
1 mm and a detection rate above 70 % can be obtained.
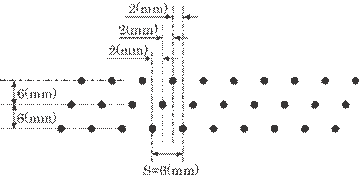
Fig. 6.13 Optimum
arrangement of the needle electrode for practical use.
In
this case, the roller diameter should be large enough compared to the spacing
of the lines of needles. The practical roller diameter was about 300 mm, which
was large enough for this purpose.
(c)
Pinhole size, ![]()
The
size of the pinhole to be detected was set between 0.1 and 0.5 mm. Predominantly used sizes in these experiments
were 0.1 and 0.3 mm. Sizes smaller than 0.1 mm, i.e., 0.05 mm, and larger than
0.3 mm, i.e., 1.0 mm were included to examine the effect of size on the
detection rate. The detection rate for the size of 1.0 mm increased only about
10%. That is, pinhole size only slightly affects the detection rate.
(d) Moving velocity of the glass wool paper, v
The
increase in velocity increased the mean discharge voltage as shown in section
6.3.3, and then the moving velocity of the glass wool paper was fixed at v = 3
m/min, for experimental convenience. The practical velocity was, however, about
10 m/min. Preliminary experiments showed that the practical velocity of 10
m/min decreased the detection rate about 30 %. Thus the factor of velocity
presents an identifiable problem for the practical application of this method
in a manufacturing plant.
B. Effect
of R on the Discharge Current and Voltage
Figure 6.14 shows an example of the
discharge characteristics for R = 0, 1, 10, and 100 M![]() . It is shown in this figure that changes in the high
resistance R changes the discharge current. A continuous discharge has, albeit
exceptionally, occurred even in the absence of a pinhole at about R = 10 M
. It is shown in this figure that changes in the high
resistance R changes the discharge current. A continuous discharge has, albeit
exceptionally, occurred even in the absence of a pinhole at about R = 10 M![]() , and subsequently damaged the glass wool paper. A higher
resistance than R = 100 M
, and subsequently damaged the glass wool paper. A higher
resistance than R = 100 M![]() , such as 200 M
, such as 200 M![]() , failed to cause a discharge. An optimum value of the
resistance as expected from this experiment may be R = 100 M
, failed to cause a discharge. An optimum value of the
resistance as expected from this experiment may be R = 100 M![]() .
.
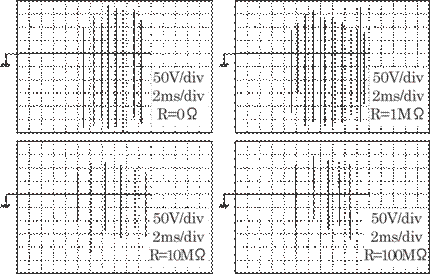
Fig. 6.14 Effect of high
resistance on the discharge characteristics.
In
conclusions, following results were obtained.
(1) Detectable pinhole size was between
0.1mm and 1.0 mm, and the detection rate was above 70% for the tested range of
pinhole sizes.
(2) The production rate of inferior goods
was reduced to approximately 33% by this method.
(3) These results were satisfactory for purposes
of practical use, and the system has since been successfully implemented in a
manufacturing plant.
References
in Chap. 6 Part I:
1)
M. Ueda, K. Kagawa, Y. Sugino, K. Moriya, J. Chen, & T. Matsui: A
new method for
detecting
vacuum leakage of a pressure sensor using a pulse discharge technique, J. Phys.
D: Appl. Phys. 30(1997), 703-707
2) S. C.
Brown: Introduction to Electrical Discharge in Gases (1996,
3) F.
Reif: Fundamentals of Statistical and Theoretical Physics (1965,
4)
E. H. Kennard: Kinetic Theory of Gases (1938,
5) M.
Ueda, K. Kagawa, Y. Sugino, K. Moriya, and T. Matsui, "A new method for
detecting vacuum leakage of a pressure sensor using a pulse discharge
technique", J. Phys. D: Appl. Phys., 30(1997) p. 703.
6)
W. R. Harper, Contact and Frictional Electrification, (1967) p. 76.
7) J.
Chen, M. Ueda, K. Asada, and K. Taniguchi, "Realtime Densitometer for
Glass Wool Using Solar Cell," Opt. Laser Engr. 29(1998), p. 61.
8) M.
Ueda, J. Chen, K. Taniguchi, and K. Asada, "Realtime Densitometer for
Glass Wool Using Solar Cell - for Industrial Use," Rev. Laser Engr.
26(1998), p. 328.
9)
J.
Chen, Y.U. Lee, M. Ueda, K. Taniguchi, and K. Asada, "A Simple Optical
Method for the Measurement of Glass Wool Fiber Diameter," Opt. Laser Engr.
29(1998), p. 67.
[Editor’s
Note: This concludes Part I of Chapter 6; the final installent of this book, Chapter
6 Part II, will appear in the upcoming May-June issue of this Journal.]
[ BWW Society Home Page ]
© 2011 The Bibliotheque: World Wide Society