Fundamentals and Practices of Sensing Technologies
by Dr. Keiji Taniguchi, Hon. Professor of Engineering
University of Fukui, Fukui, Japan
Xi’ an University of Technology, Xi’ an, China
Dr. Masahiro Ueda, Honorary Professor, Faculty of Education and Regional Studies
University of Fukui, Fukui, Japan
Dr. Ningfeng Zeng, an Engineer of Sysmex Corporation
(A Global Medical Instrument Corporation), Kobe, Japan
Dr. Kazuhiko Ishikawa, Assistant Professor
Faculty of Education and Regional Studies, University of Fukui, Fukui, Japan
[Editor’s Note: This paper is presented as Part XII of a series from the new book “Fundamentals and Practices of Sensing Technologies”; subsequent chapters will be featured in upcoming issues of this Journal.]
Chapter Five – Part IV
5.11 Thickness Sensor for Glass Bottle
5.11.1 Introduction
Despite the emergence of plastics in the last half-century, bottles are still widely used as vessels for containing liquids. Recently, bottles of minimum thickness have been manufactured in order to lighten the weight for ease of conveyance, minimize the cost of their production, and save resources. However, bottles must be manufactured in such a way as to prevent their breakage during conveyance and use. Breakage is often due to a lack of uniformity in the bottle's thickness. Thus, a real-time and non-contact method for measuring bottle thickness is required for their systematic mass production.
For this purpose, some non-destructive methods have been developed using light43)~47), including our method45)~47). The method using ultrasound has generally poor resolution in thickness measurement. The method using radioisotopes has higher resolution, but this method is rather expensive to employ systematically.
An optical system is usually easy to construct and has sufficient resolution for practical use. However, the methods described in the Ref.43) depend on laser-light interference, and thus cannot be used in on-line measurement due to vibration. The method described in the Ref.44) measures bottle thickness directly based on the reflection method, which is employed in our method as a supplementary method for the determination of the bottle center. The reflection method usually has higher sensitivity; however, it can only be applied to a mirror-like surface because the reflected light must be received clearly on the CCD array47). Since the surface of a bottle is often rough, the practical application of this method is limited. Further, the surface requires a uniform inclination so that the reflected light can be captured on a relatively small CCD array. The image method, as opposed to the reflection method, can easily be used on rough surfaces and avoid such requirements.
The previous methods43),44) produce some measurement errors in practical use due to the bottle's vibration, i.e., the dislocation of a bottle center, caused by on-line measurement. This dislocation causes a change of the incident angle of the laser light on the surface, which causes a measurement error and prevents the practical use of such systems. In this section, we propose a simple and ingenious system for accurately measuring bottle thickness; the proposed system combines the image method and the reflection method and produces no measurement error, making it feasible for successful employment in practical contexts45),46).
5.11.2 Principle and Method
A. Outline of the Method
This method uses both reflected and scattered lights on the bottle surface and is based on the diffraction of these lights at each boundary. Figure 5.57 shows the optical principle for this method. The scattered light on both the outer and inner surfaces of the bottle is focused onto a CCD array by means of both lenses, as shown in Fig. 5.57(a): we call this "the image method". On the other hand, the reflected light on both the outer and inner surfaces of the bottle reaches the CCD array directly as shown in Fig. 5.57(b): we call this "the reflection method". Both image and reflection methods have successfully been used for measuring surface displacement and surface roughness in our previous paper, where the optical basis has been described in detail47).
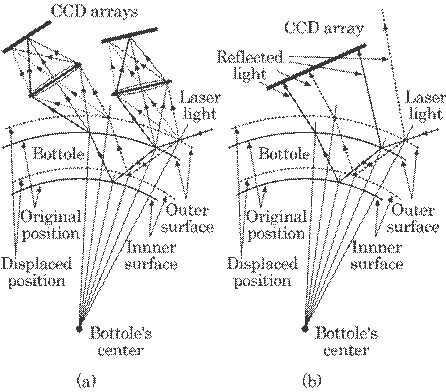
Fig. 5.57 Optical principle for this method: (a) for the image method, (b) for the reflection method.
The reflection method usually has higher sensitivity than the imaging method. It cannot, however, be applied to rough surfaces and surfaces with local curvature, because the reflected light on such a surface cannot be captured on the CCD array as shown by the dotted line in Fig. 5.57(b). By contrast, the image method shown in Fig. 5.57(a) can be successfully used in such situations. Thus, the technique in this paper is based fundamentally on the image method, with the reflection method used as a supplementary method to detect a dislocated bottle center as described in 5. 11. 2. C.
When an irradiated surface is dislocated mainly due to the change of bottle thickness and the dislocation of the bottle center, the surface and thus the image position on the CCD array changes, which makes it possible to measure the bottle thickness.
B. Analysis of Bottle Thickness under the Condition of a Fixed Center with Two Lenses
The image method is first analyzed using a fixed bottle center and only regarding the two-lens system. Figure 5.58 shows the optical principle for measuring bottle thickness. As
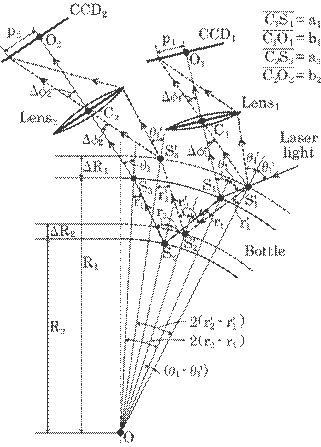
Fig. 5.58 Optical principle for measuring bottle thickness under the condition of a fixed bottle center.
described above, the thickness can be calculated by a light-ray tracing of the diffraction at each boundary. The optics are so arranged that the irradiation positions S1 and S3, corresponding to S2 for the standard thickness and O for the fixed center position, are imaged on the origins of both CCD arrays, O1 and O2. When both surfaces are dislocated slightly due to the change of thickness, these two image positions shift p1 and p2 from their origins. The thickness can then be determined by means of these shifts, p1 and p2, as follows (details are described in Appendix A):
|
|
(5.48) |
where R1 is
the outer radius of the bottle and R2 the inner radius. In this
equation, a small change in the thickness of the outer radius, ![]() R1, is
given by Eq. (A. 1), sin r1' by Eq. (A. 3), and sin r2'
by Eq. (A. 4), which are described in Appendix A.
R1, is
given by Eq. (A. 1), sin r1' by Eq. (A. 3), and sin r2'
by Eq. (A. 4), which are described in Appendix A.
Bottles
are usually manufactured using a mould, thus ensuring that the outer radius R1
will be constant. Therefore, the changes in thickness originate mainly from
changes in the inner radius when the bottle center is not displaced at every
measurement, as in this case. Here we can put ![]() R1=0 in the above equations:
this assumption is also used in the next analysis in section 5. 11. 2 C.
R1=0 in the above equations:
this assumption is also used in the next analysis in section 5. 11. 2 C.
C. Analysis of Bottle Thickness Under the Condition of a Displaced Center with One Lens
The analysis described in section 5. 11. 2 B under the condition of a fixed center is not, however, practical, because the bottle's center is dislocated in practically every measurement, which leads to measurement error. In this section, it is shown how both reflection and image methods are used for measuring bottle thickness under the condition where the bottle center is dislocated. Thus, this method essentially eliminates measurement error.
Figure 5.59 shows the optical principle for measuring bottle thickness under the condition of a dislocated center. Scattered and reflected light are, in a practical sense, detected at different directions from each other by means of a half-mirror between the surface and a focusing lens, as shown in Fig. 5.59(c); the scattered light is detected on the CCDA array and the reflected light on the CCDB array. However, it is clear from Figs. 5.59(a) and (b) that the reflected light is also detected in the same direction as the scattered light, as if the half mirror does not exist, for the convenience of analysis. In these figures, the solid lines depict reflected and scattered light rays from the surface without center dislocation and the broken lines depict the rays from a surface displaced by center dislocation.
The
position of the bottle center is analyzed by means of the position of both the
reflected light on the CCDB array and the imaged light on the CCDA
array. The shift amount ![]() R0 and its direction
R0 and its direction ![]() R0 are
calculated as follows (details in Appendix B):
R0 are
calculated as follows (details in Appendix B):
|
|
(5.49-1) |
|
|
(5.49-2) |
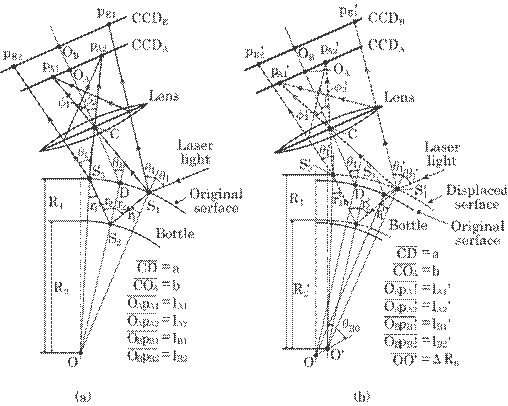
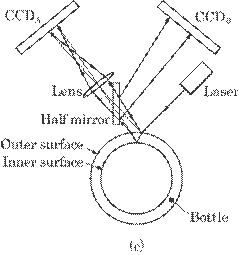
Fig. 5.59 Optical principle for measuring bottle thickness under the condition of a displaced center: (a) without center dislocation, and (b) with center dislocation. (c) outline of both scattered and reflected light rays.
where, ![]() 1', which
is the incident angle on a displaced surface, is given by Eq. (B. 3); k1
is given by Eq. (B. 1) and ; k2 by Eq. (B. 2), as described in
Appendix B.
1', which
is the incident angle on a displaced surface, is given by Eq. (B. 3); k1
is given by Eq. (B. 1) and ; k2 by Eq. (B. 2), as described in
Appendix B.
As described in 5. 11. 2. B, the outer radius is assumed to be practically constant, and any change of thickness can then be determined by means of the inner radius R2', which is distinguished from R2 in section 5. 11. 2. B. The inner radius, R2', for this center position can then be calculated as follows (details in Appendix C):
|
|
(5.50) |
where t12 is
given by Eq. (C. 3), t14 by Eq. (C. 4), ![]() 2 by Eq. (C. 1),
and r1'' by Eq. (C. 2), as described in Appendix C.
2 by Eq. (C. 1),
and r1'' by Eq. (C. 2), as described in Appendix C.
5.11.3 Results and Discussions
A. Practical System
Figure 5.60 shows the schema of our practical system for measuring bottle thickness under the condition of a dislocated center by a combination of the image and reflection methods. The system is composed of two main subsystems, i.e., the data processing
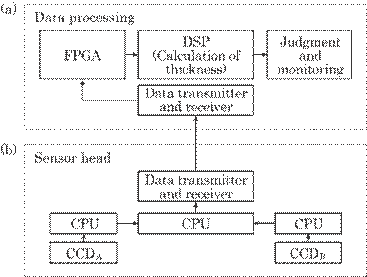
Fig. 5.60 Block diagram of this system for measuring bottle thickness under the condition of a displaced center by means of both image and reflection methods, (a) for the data-processing subsystem, and (b) for the sensor head.
subsystem shown in Fig. 5.60(a) and the sensor head shown in Fig. 5.60(b). The data obtained by both CCD arrays are A/D converted and amplified by means of an A/D converter. The data acquisition and data transmission are controlled by means of the CPU. Such data lead to a FPGA (field programmable gate array), and then to a DSP (digital signal processor) through a data transmitter and receiver. This DSP is the interface for fast-signal transmission with low-voltage differential signaling. The data are processed at the DSP, and the results including judgment of the bottle's acceptability are displayed on a monitor.
Both the scattered and reflected light from the outer and inner surfaces is received on the CCDA and CCDB arrays. The scattered light is focused onto the CCDA array by a focusing lens. The reflected light is, however, defocused on the CCDA due to the focusing lens, and is evenly distributed on this array. Thus, the image of the scattered light is clearly detected. On the other hand, reflected light from both surfaces is received on the CCDB array by a half mirror placed between the bottle and the lens. The scattered light spreads widely and is evenly distributed over this array. Thus, only the reflected light can be clearly detected on CCDB array. This scheme is mainly used to calculate the bottle's center. In conclusion, an image point on the CCDA array and the reflection direction, i.e., a position on the CCDB array, are clearly detected by this separation of the two kinds of light.
The measurement frequency of this system depends on the data acquisition speed of the CCD array and the data-processing speed. A data-processing speed which is between a few tens and a few hundreds kHz is sufficiently high. Then, the measurement frequency depends on the data-acquisition speed of the CCD array: CCD arrays with the speed of a few kHz are now on the market. Some measurements, usually a few tens measurements, are smoothed to obtain an accurate result because each signal will have a noise due to vibration caused by on-line measurement29). Thus the measurement frequency is finally a few hundreds of Hz, which is sufficient for practical use.
B. Resolution by Means of Simulation Experiment
A simulation experiment was performed using the computer software "Zemax(r)", which is widely used for calculating optical paths, to estimate several optical characteristics: resolution, focusing characteristics, etc. This method is essentially based on the diffraction at the boundary. Figure 5.61 shows the optical arrangement in the simulation. The incident angle is determined for the bottle top as shown in this figure, and thus is not the same as that found on a normal surface.
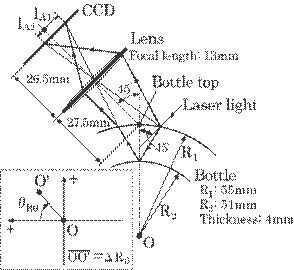
Fig. 5.61 Optical arrangement for a simulation experiment by means of the computer software "Zemax(r)".
Table
5.6 shows the position detected on the CCD array for an optical arrangement
involving combinations of different incident angles and dislocations. The
resolution ![]() Rres,
i.e., the smallest detectable difference of the thickness, can then be
determined by means of the change of bottle thickness
Rres,
i.e., the smallest detectable difference of the thickness, can then be
determined by means of the change of bottle thickness ![]() R, the change of irradiation
position on the CCD array
R, the change of irradiation
position on the CCD array ![]() d and the resolution
d and the resolution ![]() Dres of this CCD
array as follows:
Dres of this CCD
array as follows:
|
|
(5.51) |
This resolution varies
depending on the optical arrangement, such as incident angle ![]() , the magnification
of the imaging optics, the position of the bottle center and the bottle
thickness.
, the magnification
of the imaging optics, the position of the bottle center and the bottle
thickness.
Table
5.7 shows the resolution obtained from the data in Table 5.6. The mean
resolution for this arrangement was between 10 and 50 ![]() m, which is sufficient for
practical application since the allowable maximum error for this purpose is
about 0.1 mm. A smaller incident angle and lower magnification increase the
value of
m, which is sufficient for
practical application since the allowable maximum error for this purpose is
about 0.1 mm. A smaller incident angle and lower magnification increase the
value of ![]() Rres,
since in this case the change of irradiation position,
Rres,
since in this case the change of irradiation position, ![]() d, becomes smaller for the
same value of
d, becomes smaller for the
same value of ![]() R.
R.
Table 5.6 Irradiation position in mm on the CCD array by the optical arrangement in Fig. 5.61 using the computer software "Zemax(r)", (a) for lA1, and (b) for lA2.
|
|
|
Resolution on the CCD array (a)lA1, (b)lA2 |
|||
|
|
|
|
|
|
|
|
(a) |
0 |
1.347mm |
1.321mm |
1.289mm |
1.253mm |
|
45 |
1.347mm |
1.542mm |
1.786mm |
2.015mm |
|
|
90 |
1.347mm |
1.684mm |
2.029mm |
2.383mm |
|
|
135 |
1.347mm |
1.600mm |
1.855mm |
2.112mm |
|
|
180 |
1.347mm |
1.369mm |
1.385mm |
1.396mm |
|
|
225 |
1.347mm |
1.130mm |
0.914mm |
0.700mm |
|
|
270 |
1.347mm |
1.020mm |
0.700mm |
0.388mm |
|
|
315 |
1.347mm |
1.102mm |
0.854mm |
0.608mm |
|
|
360 |
1.347mm |
1.321mm |
1.289mm |
1.253mm |
|
|
(b) |
0 |
1.576mm |
0.280mm |
-1.000mm |
-2.266mm |
|
45 |
1.576mm |
0.411mm |
-0.739mm |
-1.875mm |
|
|
90 |
1.576mm |
1.222mm |
0.867mm |
0.515mm |
|
|
135 |
1.576mm |
2.248mm |
2.923mm |
3.600mm |
|
|
180 |
1.576mm |
2.887mm |
4.217mm |
5.566mm |
|
|
225 |
1.576mm |
2.755mm |
3.949mm |
5.159mm |
|
|
270 |
1.576mm |
1.929mm |
2.283mm |
2.636mm |
|
|
315 |
1.576mm |
0.905mm |
0.235mm |
-0.433mm |
|
|
360 |
1.576mm |
0.280mm |
-1.000mm |
-2.266mm |
|
Table 5.7 Resolution in ![]() m obtained by the optical
arrangement shown in Fig. 5. (a) Result obtained by the scattered light on the
inner surface with a small decrease in bottle thickness of -0.1 mm by changing
the original inner radius from R2=51 mm to 51.1 mm. (b) Result
obtained by the scattered light on the inner surface with a small increase in
bottle thickness of 0.1 mm by changing the original inner radius from R2=51
mm to 50.9 mm. (c) Result obtained by the scattered light on the outer surface
with a small decrease in bottle thickness of -0.1 mm by changing the original
outer radius from R2=55 mm to 54.9 mm. (d) Result obtained by the
scattered light on the inner surface with a small decrease in bottle thickness
of -0.1 mm by changing the original outer radius from R2=55 mm to
54.9 mm. (e) Result obtained by the scattered light on the outer surface with a
small increase in bottle thickness of 0.1 mm by changing the original outer
radius from R2=55 mm to 55.1 mm. (f) Result obtained by the
scattered light on the inner surface with a small increase in bottle thickness
of 0.1 mm by changing the original outer radius from R2=55 mm to
55.1 mm.
m obtained by the optical
arrangement shown in Fig. 5. (a) Result obtained by the scattered light on the
inner surface with a small decrease in bottle thickness of -0.1 mm by changing
the original inner radius from R2=51 mm to 51.1 mm. (b) Result
obtained by the scattered light on the inner surface with a small increase in
bottle thickness of 0.1 mm by changing the original inner radius from R2=51
mm to 50.9 mm. (c) Result obtained by the scattered light on the outer surface
with a small decrease in bottle thickness of -0.1 mm by changing the original
outer radius from R2=55 mm to 54.9 mm. (d) Result obtained by the
scattered light on the inner surface with a small decrease in bottle thickness
of -0.1 mm by changing the original outer radius from R2=55 mm to
54.9 mm. (e) Result obtained by the scattered light on the outer surface with a
small increase in bottle thickness of 0.1 mm by changing the original outer
radius from R2=55 mm to 55.1 mm. (f) Result obtained by the
scattered light on the inner surface with a small increase in bottle thickness
of 0.1 mm by changing the original outer radius from R2=55 mm to
55.1 mm.
|
|
|
Resolution for |
|
|
|
|
|
|
|
(a) |
0 |
10.8 |
11.4 |
|
90 |
10.8 |
10.7 |
|
|
180 |
10.8 |
10.1 |
|
|
270 |
10.8 |
10.9 |
|
|
360 |
10.8 |
11.4 |
|
|
(b) |
0 |
10.6 |
11.4 |
|
90 |
10.6 |
10.5 |
|
|
180 |
10.6 |
10.0 |
|
|
270 |
10.6 |
10.8 |
|
|
360 |
10.6 |
11.4 |
|
|
(c) |
0 |
15.2 |
15.2 |
|
90 |
15.2 |
14.1 |
|
|
180 |
15.2 |
15.0 |
|
|
270 |
15.2 |
16.4 |
|
|
360 |
15.2 |
15.2 |
|
|
(d) |
0 |
38.5 |
47.6 |
|
90 |
38.5 |
47.6 |
|
|
180 |
38.5 |
30.3 |
|
|
270 |
38.5 |
32.3 |
|
|
360 |
38.5 |
47.6 |
|
|
(e) |
0 |
15.4 |
15.2 |
|
90 |
15.4 |
13.9 |
|
|
180 |
15.4 |
14.9 |
|
|
270 |
15.4 |
16.1 |
|
|
360 |
15.4 |
15.2 |
|
|
(f) |
0 |
35.7 |
47.6 |
|
90 |
35.7 |
45.5 |
|
|
180 |
35.7 |
29.4 |
|
|
270 |
35.7 |
31.3 |
|
|
360 |
35.7 |
47.6 |
|
In conclusions, the following results were obtained.
(1) The system consists of two main subsystems: one is a sensor head consisting of a laser as a light source, two CCD arrays for detecting the position of both reflected and scattered light and a focusing lens to image the light scattered on the CCD array, and the other is a data-processing subsystem consisting of a personal computer with an A/D converter and amplifier, and a monitor for displaying a thickness.
(2) The resolution of
this method, i,e., the smallest measurable change in thickness, was between 10
and 50![]() m for
a CCD array with a pixel size of 10
m for
a CCD array with a pixel size of 10 ![]() m. This resolution is sufficient for
practical applications. The measurement frequency of this system is about a few
hundreds of Hz for a few tens of data smoothing. This is also sufficient for a
practical use.
m. This resolution is sufficient for
practical applications. The measurement frequency of this system is about a few
hundreds of Hz for a few tens of data smoothing. This is also sufficient for a
practical use.
Appendix A
A
small change in bottle thickness, ![]() R2~
R2~![]() R1, in the case of
a fixed bottle center, is derived by the following procedure. Some sectional
details in this appendix are based on those shown in Fig. 5.58.
R1, in the case of
a fixed bottle center, is derived by the following procedure. Some sectional
details in this appendix are based on those shown in Fig. 5.58.
First,
the small change in the outer radius, ![]() R1, and the change in the
incident angle from
R1, and the change in the
incident angle from ![]() 1 to
1 to ![]() 1' due to change of
bottle thickness, are calculated by means of the law of cosines and sines for
the triangle
1' due to change of
bottle thickness, are calculated by means of the law of cosines and sines for
the triangle ![]() S1OS1'
as follows. Denoting the distance between S1 and S1' by
S1OS1'
as follows. Denoting the distance between S1 and S1' by ![]() , we obtain the
following relation for
, we obtain the
following relation for ![]() R1, from the law of cosines:
R1, from the law of cosines:
|
|
|
The small change of the
outer radius, ![]() R1,
can, then, be obtained as follows:
R1,
can, then, be obtained as follows:
|
|
(A.1) |
where
|
|
|
which can be obtained by
means of the law of sines for the triangle ![]() C1S1S1'
in Fig. 5.58. Further, we obtain the following relation for sin
C1S1S1'
in Fig. 5.58. Further, we obtain the following relation for sin![]() 1' by
means of the law of sines for the triangle
1' by
means of the law of sines for the triangle ![]() S1OS1' :
S1OS1' :
|
|
|
which leads to the following relation by means of (A. 1):
|
|
|
Next,
we obtain the following relation for ![]() 1 and sin
1 and sin![]() by means of the law of
cosines and law of sines for the triangle
by means of the law of
cosines and law of sines for the triangle ![]() C2OS3' and
C2OS3' and ![]() C2OS3:
C2OS3:
|
and,
|
|
where ![]() 1 is the
distance between C2 and O,
1 is the
distance between C2 and O, ![]() , and
, and ![]() the angle between
the angle between ![]() OC2S3.
Then, the following relation for sin
OC2S3.
Then, the following relation for sin ![]() corresponding to the angle
corresponding to the angle ![]() OS3'C2,
can be obtained by referring to triangle
OS3'C2,
can be obtained by referring to triangle ![]() C2OS3':
C2OS3':
|
|
|
which leads to a following relation:
|
|
|
where
|
|
|
as shown in Fig. 5.58.
Finally,
we obtain the relation for ![]() R2 by means of the law of
sines for a triangle
R2 by means of the law of
sines for a triangle ![]() OS1'S2':
OS1'S2':
|
|
|
which leads to:
|
|
(A.2) |
where
|
|
(A.3) |
|
|
(A.4) |
and r2 can be obtained as in appendix B.
Appendix B
The
dislocated center position of the bottle, ![]() R0 and
R0 and ![]() R0, can be analyzed
by means of the sectional details shown in Fig. 5.62, which are based on Fig.
5.59(b).
R0, can be analyzed
by means of the sectional details shown in Fig. 5.62, which are based on Fig.
5.59(b).
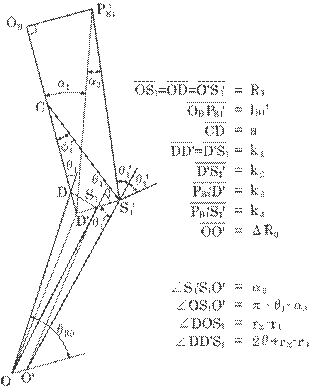
Fig. 5.62 Sectional details for light rays at each boundary to detect the position of the
displaced
bottle center, ![]() R0
and
R0
and![]() R0.
R0.
The angle ![]() 1' in Fig.
3(b) is obtained experimentally as follows:
1' in Fig.
3(b) is obtained experimentally as follows:
|
|
|
The angle r2
in Fig. 3(a) is obtained from the law of sines for triangle ![]() OS3S2 as
follows:
OS3S2 as
follows:
|
|
|
The distance ![]() in Fig.5.62, denoted
by k1, is obtained by means of the law of sines for triangle
in Fig.5.62, denoted
by k1, is obtained by means of the law of sines for triangle ![]() DOD':
DOD':
|
|
(B.1) |
The distance ![]() , denoted by k2,
is also obtained by means of the laws of sines for triangle
, denoted by k2,
is also obtained by means of the laws of sines for triangle
![]() CD'S1':
CD'S1':
|
|
(B.2) |
Likewise, the distance ![]() , denoted by k3,
is given by
, denoted by k3,
is given by
|
|
|
The angle ![]() 1=
1=![]() OBD'PB1'
can then be expressed by means of k3 and lB1', which is
obtained experimentally:
OBD'PB1'
can then be expressed by means of k3 and lB1', which is
obtained experimentally:
|
|
|
Then by means of these
values, the distance ![]() , denoted by k4, is
calculated using the law of cosines for triangle
, denoted by k4, is
calculated using the law of cosines for triangle ![]() PB1'D' S1':
PB1'D' S1':
|
|
|
The angle ![]() 2=
2=![]() D'PB1'S1'
is then obtained by means of the law of sines for this triangle as follows:
D'PB1'S1'
is then obtained by means of the law of sines for this triangle as follows:
|
|
|
Angle ![]() 1' is
expressed as follows:
1' is
expressed as follows:
|
|
(B.3) |
The center dislocation ![]() R0 and
R0 and ![]() R0 as
expressed by Eqs. (2a) and (2b) in the text can be obtained finally by means of
the law of cosines for triangle
R0 as
expressed by Eqs. (2a) and (2b) in the text can be obtained finally by means of
the law of cosines for triangle ![]() S1OO' and the law of sines
for this triangle.
S1OO' and the law of sines
for this triangle.
Appendix C
In
this appendix, the inner radius R2', which ultimately provides the
bottle thickness, is derived for the dislocated center position. Some distances
t1~t11, and angles ![]() ,
, ![]() ,
, ![]() and
and ![]() are defined as those in Fig. 5.62 and
Fig. 5.63(a). The distance
are defined as those in Fig. 5.62 and
Fig. 5.63(a). The distance ![]() , denoted by t1, is obtained
by means of the law of sines for triangle
, denoted by t1, is obtained
by means of the law of sines for triangle ![]() CD'S1' as follows:
CD'S1' as follows:
|
|
|
where the angle ![]() 2' is
obtained experimentally by
2' is
obtained experimentally by
|
|
|
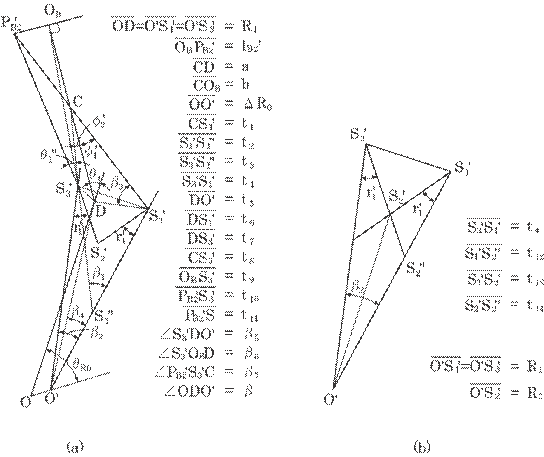
Fig. 5.63 Sectional details for light rays at
each boundary to obtain the inner radius R2': (a) for the calculation of
t1~t11, and angles ![]() ,
,
![]() ,
, ![]() and
and ![]() , (b) for the
calculation of t12~t14 and R2'.
, (b) for the
calculation of t12~t14 and R2'.
Angle ![]() 1 can then
be obtained as follows:
1 can then
be obtained as follows:
|
|
|
The distance ![]() , denoted by t2,
can then be calculated by means of the law of cosines for triangle
, denoted by t2,
can then be calculated by means of the law of cosines for triangle ![]() CS1''S1':
CS1''S1':
|
|
|
Similarly, the distance ![]() , denoted by t3,
can be calculated by means of the law of cosines for triangle
, denoted by t3,
can be calculated by means of the law of cosines for triangle ![]() S3'O'S1'':
S3'O'S1'':
|
|
|
The angle ![]() 2 is then
obtained by means of the law of sines for this triangle as follows:
2 is then
obtained by means of the law of sines for this triangle as follows:
|
|
(C.1) |
The distance ![]() , denoted by t4,
can be calculated by means of the law of cosines for triangle
, denoted by t4,
can be calculated by means of the law of cosines for triangle ![]() S3'O'S1',
S3'O'S1',
|
|
|
The distance ![]() , denoted by t5,
can also be calculated by means of the law of cosines for triangle
, denoted by t5,
can also be calculated by means of the law of cosines for triangle ![]() DOO':
DOO':
|
|
|
Using these values, the
angle ![]() 4
and the distance
4
and the distance ![]() ,
denoted by t6, can be obtained by means of the laws of sines and
cosines for triangle
,
denoted by t6, can be obtained by means of the laws of sines and
cosines for triangle ![]() DO'S1':
DO'S1':
|
|
|
Then the distance ![]() , denoted by t7,
can also be calculated by the law of cosines for triangle
, denoted by t7,
can also be calculated by the law of cosines for triangle ![]() S3'O'D:
S3'O'D:
|
|
|
from which, the angle ![]() 5 is
obtained by means of the law of sines for this triangle:
5 is
obtained by means of the law of sines for this triangle:
|
|
|
The small angle ![]() , which is caused by
a center dislocation, is obtained by means of the law of sines for triangle
, which is caused by
a center dislocation, is obtained by means of the law of sines for triangle ![]() ODO':
ODO':
|
|
|
from which the angle ![]() S3'DC is
given by:
S3'DC is
given by:
|
|
|
The distance ![]() denoted by t8,
is then calculated by means of the law of sines for triangle
denoted by t8,
is then calculated by means of the law of sines for triangle ![]() CS3'D:
CS3'D:
|
|
|
The distance ![]() denoted by t9,
and the angle
denoted by t9,
and the angle ![]() 6
can also be calculated by means of the laws of cosines and sines for triangle
6
can also be calculated by means of the laws of cosines and sines for triangle ![]() OBS3'D:
OBS3'D:
|
|
|
The distance ![]() denoted by t10,
can then be calculated by means of the law of cosines for triangle
denoted by t10,
can then be calculated by means of the law of cosines for triangle ![]() OBPB2'S3':
OBPB2'S3':
|
|
|
Further, the distance ![]() denoted by t11,
can also be calculated by means of the law of cosines for triangle
denoted by t11,
can also be calculated by means of the law of cosines for triangle ![]() OBPB2'C:
OBPB2'C:
|
|
|
The angle ![]() 7, can be
obtained by means of the law of cosines for triangle
7, can be
obtained by means of the law of cosines for triangle ![]() PB2'S3'C:
PB2'S3'C:
|
|
|
where,
|
|
(C.2) |
We then calculate some values required for the calculation of R2' by means of Fig. 5.63(b).
The
distance ![]() ,
denoted by t12, can be calculated by means of the law of sines for
triangle
,
denoted by t12, can be calculated by means of the law of sines for
triangle ![]() S3'S2''S1':
S3'S2''S1':
|
|
(C.3) |
The distance ![]() , denoted by t13,
can also be calculated by means of the law of sines for triangle
, denoted by t13,
can also be calculated by means of the law of sines for triangle ![]() S3'S2'S1':
S3'S2'S1':
|
|
|
Further, the distance ![]() , denoted by t14,
is calculated by means of the law of cosines for triangle
, denoted by t14,
is calculated by means of the law of cosines for triangle ![]() S1'S2'S2'':
S1'S2'S2'':
|
|
(C.4) |
Using the above obtained
values, the inner radius R2' can finally be given by Eq. (5.50) in
the text by means of the law of cosines for triangle ![]() S2'OS2''.
S2'OS2''.
5.12 Thickness Sensor for Film
5.12.1 Introduction
Thin films, for an example a lap film, and thin coatings, for examples an insulating vanish and a ceramic coating, have recently seen increasing use in many industries such as semiconductor and IC industries, the packaging industry, and the automobile industry. In these cases, accurate and real-time measurement of the thickness of coatings and films is very important for determining durability and cost performance. Many methods using light have been developed and realized48)~50). These methods are based on laser light interferometry and have high accuracy. However, they were not real time measurement, and further expensive.
In addition to these methods, we have proposed an optical method using laser interference at many incident angles for direct measuring of the thickness of a thin film or a coating.51) However, this method could not measure the film thickness in real-time since the method required a movable mechanism to allow variations in the incident angle. We then improved the method so as to measure thickness in real-time by means of a sheet laser light and a CCD array sensor.52),53) This method was based on a time smoothing of many reflected lights from slightly different irradiation positions. Thus, the method can measure thickness roughly in real time.
In this section, a practical system for measuring film thickness essentially in real time has been devised which involves a laminar-like laser light and a CCD camera. The system's performance is also discussed.54)
5.12.2 Principle and Method
A. Previous Method Using a Sheet Laser Light
The
basic principle of this method depends on a multi-wave laser interference of
both light reflected on the upper and lower surfaces of the coating, as was
shown in the previous paper51). The reflective power of both
surfaces affects only a contrast of the interfered light intensity and does not
affect measurement errors of the thickness. An outline of the previous method
using a sheet laser light is described in detail in this section. Figure 5.64 expresses
the basic principle of this method. The basic optical arrangement consists of a
laser, a collimator (not shown in this figure), two cylindrical lenses, and a
photo-receiver. A sheet laser light is focused on the film as a point
illuminator and is reflected onto a photo-receiver array. As is shown in
this figure, each small portion of the sheet laser light is received on a
corresponding small portion of the photo-receiver array such as ![]() to
to ![]() ', and
', and ![]() to
to ![]() '.
'.
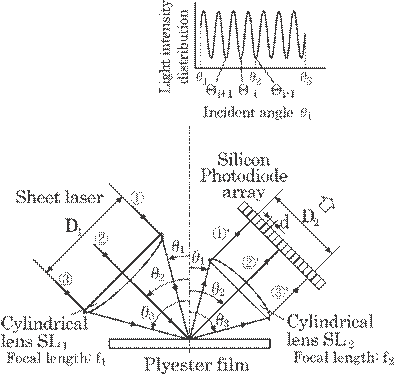
Fig. 5.64 Basic optical arrangement for measuring film thickness by means of laser interferometry.
This eliminates the need
of a mechanism for varying the incident angles as required for the previous
method.51) The spatial resolution of incident angle, ![]() m, is then
determined by an element size of the photo-receiver array, d, and a focal
length of the cylindrical lens SL2, f2, as follows:
m, is then
determined by an element size of the photo-receiver array, d, and a focal
length of the cylindrical lens SL2, f2, as follows:
|
|
(5.52) |
The maximum variable
range of the incident angle, (![]() 3-
3-![]() 1)max in
this case, is given by whichever is the smaller of the two bellow:
1)max in
this case, is given by whichever is the smaller of the two bellow:
|
|
(5.53) |
where ![]() 3 and
3 and ![]() 1 are the
maximum and minimum incident angles, D1 and D2 the effective
size of both cylindrical lenses SL1 and SL2, and f1
and f2 the focal length of these lenses.
1 are the
maximum and minimum incident angles, D1 and D2 the effective
size of both cylindrical lenses SL1 and SL2, and f1
and f2 the focal length of these lenses.
The reflected lights on both the upper and lower surfaces of the film interfere with each other and result in a sign-like intensity distribution R on the CCD array sensor as is shown in a cut in Fig. 5.64, which is a basis of this method. The thickness of the film, h, can be expressed as follows:51)
|
|
(5.54) |
|
|
(5.55) |
where ![]() i
expresses the incident angle where the light intensity distribution has minimum
values, n a refractive index of the film, and
i
expresses the incident angle where the light intensity distribution has minimum
values, n a refractive index of the film, and ![]() i+1<
i+1<![]() i<
i<![]() i-1, as shown in a cut in Figure 5.64. The above two
equations are basically the same since each was derived from the same few
equations.55) Theoretically, Eq. (5.55) does not require a known n,
but it requires three consecutive
i-1, as shown in a cut in Figure 5.64. The above two
equations are basically the same since each was derived from the same few
equations.55) Theoretically, Eq. (5.55) does not require a known n,
but it requires three consecutive ![]() , i.e.,
, i.e., ![]() i+1,
i+1, ![]() i, and
i, and ![]() i-1, and
further rather high accuracy in
i-1, and
further rather high accuracy in ![]() i. On the contrary, Equation
(5.54) requires only two consecutive
i. On the contrary, Equation
(5.54) requires only two consecutive ![]() , i.e.,
, i.e., ![]() i+1,
i+1, ![]() i, but requires
known n, and can be practically used for a known n.
i, but requires
known n, and can be practically used for a known n.
B. Present Method by Means of Laminar-Like Laser Light
The
above description was a basic principle of this method, which uses a sheet
laser light. The largest problem involved in this method was a large fluctuation
in the light intensity distribution on the photo-receiver array, which makes an
accurate determination of ![]() i difficult.51)
However, this problem can be solved by means of the smoothing of many data. Two
methods are considered for this smoothing: one is time smoothing, and another
is spatial smoothing. Time smoothing was achieved in the previous method by
means of a sheet laser light51), which requires a slight shift of
the film. This prevents this method from measuring the thickness of a layer
essentially in real time.
i difficult.51)
However, this problem can be solved by means of the smoothing of many data. Two
methods are considered for this smoothing: one is time smoothing, and another
is spatial smoothing. Time smoothing was achieved in the previous method by
means of a sheet laser light51), which requires a slight shift of
the film. This prevents this method from measuring the thickness of a layer
essentially in real time.
The method was further improved so as to measure the film thickness essentially in real time by means of a laminar-like laser light. Figure 5.65 expresses the optics for this method, which uses spatial smoothing. The laminar-like laser light with a width W is focused onto a line on the film, and is reflected onto the cylindrical lens SL2, which is received on the CCD camera with horizontal dimension D2 and vertical dimension W. In the previous method, an irradiated position O on the film was slightly moved by shifting the film, and many light intensity distributions from these irradiated points were smoothed in time, i.e., time smoothing. On the contrary, many light intensity distributions arisen from line O'OO'' are recorded on a 2-D CCD camera by only one flash of laser light, and smoothed in space, i.e., spatial smoothing. This enables essentially real-time measurement, because the method does not require shifting of the film.
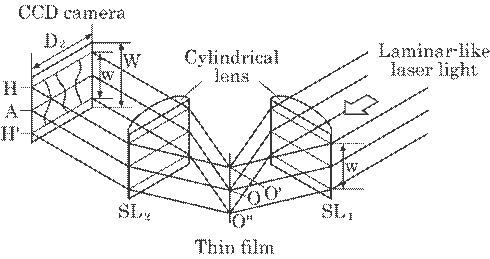
Fig. 5.65 Basic optics for measuring film thickness by means of laminar-like laser light.
C. Determination of ![]() i
i
The
method in this study requires only two or three successive incident angles ![]() i for a
determination of film thickness, as was shown in Eqs. (5.54) and (5.55).
i for a
determination of film thickness, as was shown in Eqs. (5.54) and (5.55).
Figure 5.66 shows an example of the interference pattern on the CCD camera, i,e., the light intensity distribution, to obtain spatial smoothing.29) The light intensity distribution on
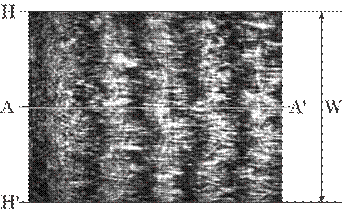
Fig. 5.66 Interference pattern on the CCD camera for spatial smoothing.
each horizontal line is
arisen from each corresponding position on a line O'OO'' on the film, and all
the data on a line O'OO'' are recorded on the CCD camera. Each light intensity
distribution can, basically, be used for the determination of ![]() i.
i.
However,
the angle ![]() i
cannot be determined from this distribution, because it fluctuates considerably
due to speckles inherent in laser light as is shown in Figure 5.67(a). Such
fluctuation can, however, be decreased by smoothing many sampling data on the
horizontal lines. The method of spatial smoothing is basically the same as that
of time smoothing. Figure 5.67 shows this smoothing effect in space. Thus, the
smoothing by N samples decreases the fluctuation remarkably; the fluctuation is
linearly proportional to 1/
i
cannot be determined from this distribution, because it fluctuates considerably
due to speckles inherent in laser light as is shown in Figure 5.67(a). Such
fluctuation can, however, be decreased by smoothing many sampling data on the
horizontal lines. The method of spatial smoothing is basically the same as that
of time smoothing. Figure 5.67 shows this smoothing effect in space. Thus, the
smoothing by N samples decreases the fluctuation remarkably; the fluctuation is
linearly proportional to 1/![]() , when the sampling data have usually a
normal distribution.29),30)
, when the sampling data have usually a
normal distribution.29),30)
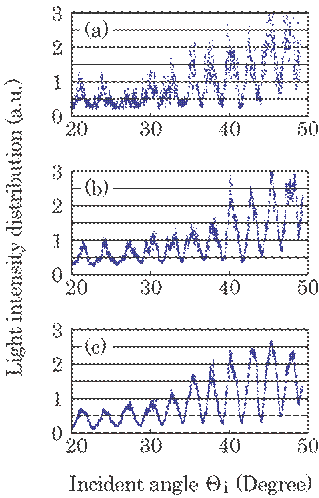
Fig. 5.67 Smoothing effect by means of the light intensity distribution on each horizontal line: (a) no smoothing, (b) smoothing by 10 samples, (c) smoothing by 50 samples.
5.12.3 Performance of the Practical System
A practical system was constructed. Figure 5.68 shows the appearance of this system, and Table 5.8 its main performance.
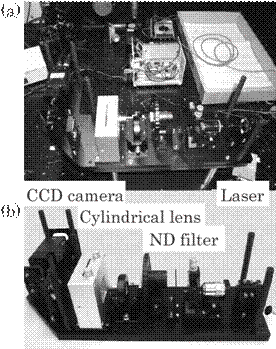
Fig. 5.68 Appearance of the system. (a) Top view, and (b) side view.
Table 5.8 Performance for this system.
|
Measuring frequency |
50Hz (in Standard) |
|
Measurable minimum thickness |
2.4 |
|
Measurable maximum thickness |
1.2mm (for Refractive index of 1.4) |
|
Working distance |
7 mm |
|
Adaptability |
Film, Coating |
|
Variable angle of the incident light |
33 |
|
Wave length of the laser |
405 nm |
|
CCD size |
5mm (Height) |
|
Focal length of the cylindrical lens |
f1=50mm, f2=25mm |
The measurement frequency of a film thickness was determined mainly by the sample number for smoothing, N, and the speed of a 16 bit A/D converter in the processing circuit. The frequency was about 50 Hz, which is almost enough for practical use.
The
measurable minimum thickness of the film is 2.4 ![]() m, and the maximum thickness is about
1.2 mm for the laser with a wavelength of 405 nm and the refractive index of a
film of 1.4, which is discussed in section 5.12.4. The working distance between
the sample and the system head is about 7 mm.
m, and the maximum thickness is about
1.2 mm for the laser with a wavelength of 405 nm and the refractive index of a
film of 1.4, which is discussed in section 5.12.4. The working distance between
the sample and the system head is about 7 mm.
A
variable range of incident angle, ![]() 1~
1~![]() 3 in Figure 5.64,
was limited to a rather small range of
3 in Figure 5.64,
was limited to a rather small range of ![]() 12
12![]() from the optical axis inclined 45
from the optical axis inclined 45![]() in the horizontal
direction from the consideration of measurement error due to the spherical
aberration of both cylindrical lenses. This lowers the resolution of this
optical system, in other words, increases the smallest measurable film
thickness to about three times of the value obtained by the variable range of 0
in the horizontal
direction from the consideration of measurement error due to the spherical
aberration of both cylindrical lenses. This lowers the resolution of this
optical system, in other words, increases the smallest measurable film
thickness to about three times of the value obtained by the variable range of 0![]() ~90
~90![]() .51) However, this
small range of incident angle reduces the measurement error of the film
thickness, as is discussed in 5.12.4.
.51) However, this
small range of incident angle reduces the measurement error of the film
thickness, as is discussed in 5.12.4.
5.12.4 Measurable Minimum and Maximum Film Thickness
Film
thickness can be calculated by means of Eq. (5.54) or (5.55). Thus, two or
three consecutive ![]() i
should exist between 45
i
should exist between 45![]()
![]() 12
12![]() for this calculation. The pitch of the
light intensity distribution, i.e., an angle between each
for this calculation. The pitch of the
light intensity distribution, i.e., an angle between each ![]() i, increases when
the thickness diminishes, and two consecutive
i, increases when
the thickness diminishes, and two consecutive ![]() i can't exist in this range
of incident angle when the thickness becomes too small, as is shown in Fig.
5.69.
i can't exist in this range
of incident angle when the thickness becomes too small, as is shown in Fig.
5.69.
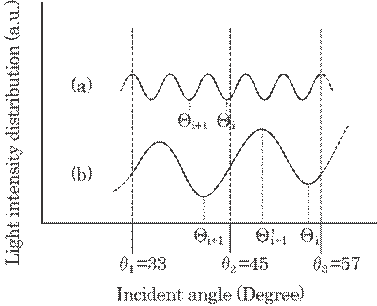
Fig. 5.69 Light intensity distribution for thick (a) and thin (b) films.
This determines the measurable minimum thickness hmin, in other words, the spatial resolution of this method, as follows;51)
|
|
(5.56) |
where ![]() 1p is the
practical minimum incident angle, and
1p is the
practical minimum incident angle, and ![]() 3p the maximum incident
angle, which are 33
3p the maximum incident
angle, which are 33![]() (=45
(=45![]() -12
-12![]() ) and 57
) and 57![]() (=45
(=45![]() +12
+12![]() ) for this practical system,
respectively, as described above. Thus, the spatial resolution can be
determined by the wavelength of the laser, the refractive index of the film,
and the minimum and maximum incident angles. As an example, hmin
) for this practical system,
respectively, as described above. Thus, the spatial resolution can be
determined by the wavelength of the laser, the refractive index of the film,
and the minimum and maximum incident angles. As an example, hmin![]() 5.9
5.9![]() =2.4
=2.4![]() m can be obtained for
m can be obtained for
![]() =405 nm and
n=1.4.
=405 nm and
n=1.4.
On
the other hand, the measurable maximum thickness is determined by the spatial
resolution of an incident angle ![]() , defined by
, defined by
|
|
(5.57) |
where d is the spatial
resolution of the CCD camera in the horizontal direction, and f2 the
focal length of the cylindrical lens SL2. In this system, the angle
resolution was found to be ![]() =4.0
=4.0![]() 10-4 for d=10
10-4 for d=10 ![]() m and f2=25
mm. Theoretically, one pitch of the light intensity distribution can be
reproduced only by two sampling data as based on the sampling theory.30)
Thus, it is practically sufficient to use ten sampling data for that
reproduction. That is, the maximum measurable thickness hmax can be
obtained when two consecutive minimum of the light intensity distribution exist
within 10
m and f2=25
mm. Theoretically, one pitch of the light intensity distribution can be
reproduced only by two sampling data as based on the sampling theory.30)
Thus, it is practically sufficient to use ten sampling data for that
reproduction. That is, the maximum measurable thickness hmax can be
obtained when two consecutive minimum of the light intensity distribution exist
within 10![]() =4.0
=4.0![]() 10-3=0.023
10-3=0.023![]() . For example, hmax
becomes 3020
. For example, hmax
becomes 3020![]()
![]() 1.22 mm by
substituting
1.22 mm by
substituting ![]() i+1=45.0
i+1=45.0![]() and
and ![]() i=45.023
i=45.023![]() into equation (5.54)
for
into equation (5.54)
for ![]() =405 nm
and n=1.4.
=405 nm
and n=1.4.
In conclusions, the following results were obtained.
(1) The system consists of two main sub-systems; one is an optical system composed of a laser having a wavelength of 405 nm, two cylindrical lenses, and a CCD camera, and another is a data processing system.
(2) The main performance
of this system is as follows, for a variable angle of incident light of 33![]() ~57
~57![]() , a laser wavelength of 405
nm, and a film refractive index of 1.4. The measuring frequency is about 50 Hz
in standard use. The measurable minimum thickness is 2.4
, a laser wavelength of 405
nm, and a film refractive index of 1.4. The measuring frequency is about 50 Hz
in standard use. The measurable minimum thickness is 2.4 ![]() m, and the maximum thickness
is 1.2 mm. The working distance is 7 mm, which is sufficient for practical use.
m, and the maximum thickness
is 1.2 mm. The working distance is 7 mm, which is sufficient for practical use.
References
43) FE Irons: An interferometric measurement of the wall thickness of a cylindrical glass tube with application to a draining liquid film, Meas. Sci. Technol. 6-9(1995) 1356.
44) T. Suzuki; Pat. : Devices for thickness measurement of glass bottle, Pat. (A) 11-190614 (1999) in Japan.
45) M. Ueda, & T. Matsumoto: System for measuring glass thickness, Pat. Pen. 2005-348137 (2005) in Japan.
46) Q. Shu, T. Kozuki, K. Ishikawa, T. Matsumoto, H. Suga, T. Sakurai, & M. Ueda: Real time measurement of a bottle thickness by means of both imaging and reflection methods, Rep. 344th Topical Meet. Laser Soc. Jpn. RTM-06-01(2006) 1.
47) M. Kawazu, K. Ishikawa, H. Suga, T. Sakurai, & M. Ueda: Real time measurement of a bottle thickness by means of both image and reflection methods, Meas. Sci. Technol. 18(2007) p. 295.
48) O. S. Heavens: Optical properties of the thin films, Dover, New York, 96(1991) p. 103.
49) H. G. Tompkins, W. A. McGham: Spectroscopic ellipsometry, a use's guide, New York, Wiley-Interscience, (1990).
50) C. Jung, B. K. Rhee: Simultaneous determination of thickness and optical constants of polymer thin film by analyzing transmittance, Appl. Opt., 41(2003) p. 3861.
51) K. Ishikawa, H. Yamano, K. Kagawa, K. Asada, K. Iwata, & M. Ueda: Measurement of thickness of a thin film by means of laser interference at many incident angles, Opt. Laser Engr., 41-1(2004) p. 19.
52) K. Ishikawa, H. Yamano, K. Kagawa, K. Asada, k. Iwata, & M. Ueda: Real-time measurement of a thickness of a thin coating by means of sheet laser, Opt. Lasers Engr.: 41-1(2004) p. 731.
53) K. Ishikawa, F. Murase, Z. Feng, & M. Ueda: Real-time measurement of a thickness of a thin coating by means of sheet laser, Rep. 308th Topical Meeting, Laser Soc. Jpn. Laser Measurements, No. RTM-03-09(2003) p. 23.
54) F. Zhu, K. Ishikawa, T. Ibe, & M. Ueda: A practical system for measuring film thickness, and some discussion, Rep. 320th Topical Meeting, Laser Soc. Jpn. No. RTM-04-06(2004) p. 1.
55) T. Tsuruta: Applied optics I and II: (1998) p. 33 ( in I) and p. 114 ( in II).
[The segment concludes Chapter 5; Chapter 6 will be presented in the upcoming March-April 2011 issue of this Journal.]
[ BWW Society Home Page ]
© 2011 The Bibliotheque: World Wide Society


